Learn How to Update and Delete Using Excel VBA Userform?
It’s useful for making a task easy in business areas like Banking records, Personal Finance, Stock Reporting, Recordkeeping, Automate Training room booking, Hotel Room booking, Car Booking, booking IT resources, and approval of business expenses such as refreshments, conveyance, stationery, etc.
Excel VBA Macros for Non-Coders
Do you find VBA Macros scary? Did you miss any job opportunity because of it? Get started today with our eBook guide on using – Excel VBA Macros. 140 pages of rich visuals. Download now.
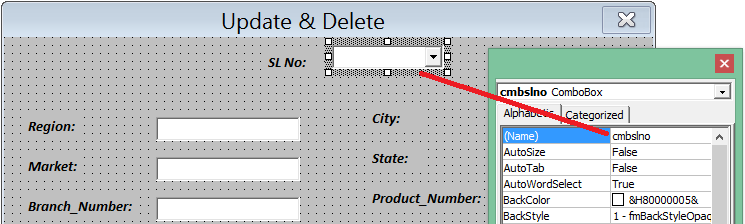
This technique will help the User access the data in the VBA Userform only and then if he\she wants to update any info, he\she can update the same by pressing the “UPDATE” button and the same records will be updated in the sheet (Database). Similarly, users can delete the records if required.
If you want to be a master at Excel VBA Programming language for Excel 2007, then our Excel VBA macros tutorials will make it easier for you to access it in applications such as Microsoft Office. Come create your own Macros and rule in excel.
(Picture 1)
(Picture 2) – VBA Userform
Step 1: Press Alt + F11.
Step 2: Click Insert, User form. If the Toolbox does not appear automatically, click View, Toolbox. Your screen should be set up as below.
Step 3: Add the controls listed in the table below. Once this has been completed, the result should be consistent with the picture of the Userform shown earlier. For example, create a text box control by clicking on TextBox from the Toolbox. Next, you can drag a text box on the Userform.
Step 4: Change the names and captions of the controls according to the table above. Names are used in the Excel VBA code. Captions are those that appear on your screen. It is good practice to change the names of controls. This will make your code easier to read. To change the names and captions of the controls, right-click on VBA Userform and click on each control.
Recommended:
Update and Delete Using Excel VBA Userform, Remove Password From Excel Using Excel VBA (Coding) or you can learn many more related tips & tricks. Learn More
Create Dynamic Graphs & Excel Presentation. Also, Learn How to create a Data Analytic Chart & Graph. Learn More
Excel VBA Macros for Non-Coders
Do you find VBA Macros scary? Did you miss any job opportunity because of it? Get started today with our eBook guide on using – Excel VBA Macros. 140 pages of rich visuals. Download now.
Once you are done creating a VBA user form which looks like UserForm shown earlier with another 2 command buttons; “Update” and “Delete”. This VBA Userform will pull up all the information from the sheet when I will choose any value in “SL No” in UserForm.
Every time you choose the “SL No” from the drop-down the value for the other fields will be changed. First click on the drop-down box in UserForm next to “SL No” to set the row source property, see the image below for your reference.
You should set a name to Object in VBA Userform as I did by naming the “SL No” drop-down box as cmbslno.
(Picture 3) – VBA Userform
Now if you choose any value from the box then the value of the other boxes will auto-populated. To do so I have applied simple Vlookup formula using VBA Code, Please refer to the codes.
Private Sub cmbslno_Change () Dim SLNo As Integer If Me.cmbslno.Value = "" Then MsgBox "SL No Can Not be Blank!!!", vbExclamation, "SL No" Exit Sub End If SLNo = cmbslno.Value On Error Resume Next Me.txtregion.Value = Application.WorksheetFunction.VLookup(SLNo, Sheets("data").Range("A2:N1087"), 2, 0) Me.txtmarket.Value = Application.WorksheetFunction.VLookup(SLNo, Sheets("data").Range("A2:N1087"), 3, 0) Me.txtbNum.Value = Application.WorksheetFunction.VLookup(SLNo, Sheets("data").Range("A2:N1087"), 4, 0) Me.txtcnum.Value = Application.WorksheetFunction.VLookup(SLNo, Sheets("data").Range("A2:N1087"), 5, 0) Me.txtcity.Value = Application.WorksheetFunction.VLookup(SLNo, Sheets("data").Range("A2:N1087"), 6, 0) Me.txtState.Value = Application.WorksheetFunction.VLookup(SLNo, Sheets("data").Range("A2:N1087"), 7, 0) Me.txtpnum.Value = Application.WorksheetFunction.VLookup(SLNo, Sheets("data").Range("A2:N1087"), 8, 0) Me.txtSdate.Value = Application.WorksheetFunction.VLookup(SLNo, Sheets("data").Range("A2:N1087"), 9, 0) Me.txtInum.Value = Application.WorksheetFunction.VLookup(SLNo, Sheets("data").Range("A2:N1087"), 10, 0) Me.txtIdate.Value = Application.WorksheetFunction.VLookup(SLNo, Sheets("data").Range("A2:N1087"), 11, 0) Me.txtSamount.Value = Application.WorksheetFunction.VLookup(SLNo, Sheets("data").Range("A2:N1087"), 12, 0) Me.txtsp.Value = Application.WorksheetFunction.VLookup(SLNo, Sheets("data").Range("A2:N1087"), 13, 0) Me.txtSR.Value = Application.WorksheetFunction.VLookup(SLNo, Sheets("data").Range("A2:N1087"), 14, 0) End Sub
If you look at the code very carefully you will notice that I have applied vlookup formula to pull up the value for the other boxes. You need to give a proper name for all the text boxes you are going to use in the form.
Recommended:
Update and Delete Using Excel VBA Userform, Remove Password From Excel Using Excel VBA (Coding) or you can learn many more related tips & tricks. Learn More
Create Dynamic Graphs & Excel Presentation. Also, Learn How to create a Data Analytic Chart & Graph. Learn More
Now you choose any value from the SL No drop-down box and you will see the values are coming from the excel sheet as shown in Picture 2.
Now if you want to update any info’s then what are the things need to do.
Whatever value you choose from the drop-down it is fetching the value of corresponding columns, Right?
So we need to first select the entire row then we can set the cell value as per our requirement.
If you choose 1 from my SL No drop down then it is showing the value from row no 2. Isn’t it? As the first row is the header. Now we need to play with this trick.
Create a Command Button and give the name like cmdupdate and change the caption to Update.
After setting the above properties double click on the “Update” button and paste the below code between the sub and end sub
Private Sub cmdupdate_Click () If Me.cmbslno.Value = "" Then MsgBox "SL No Can Not be Blank!!!", vbExclamation, "SL No" Exit Sub End If SLNo = Me.cmbslno.Value Sheets("data").Select Dim rowselect As Double rowselect = Me.cmbslno.Value rowselect = rowselect + 1 Rows(rowselect).Select Cells(rowselect, 2) = Me.txtregion.Value Cells(rowselect, 3) = Me.txtmarket.Value Cells(rowselect, 4) = Me.txtbNum.Value Cells(rowselect, 5) = Me.txtcnum.Value Cells(rowselect, 6) = Me.txtcity.Value Cells(rowselect, 7) = Me.txtState.Value Cells(rowselect, 8) = Me.txtpnum.Value Cells(rowselect, 9) = Me.txtSdate.Value Cells(rowselect, 10) = Me.txtInum.Value Cells(rowselect, 11) = Me.txtIdate.Value Cells(rowselect, 12) = Me.txtSamount.Value Cells(rowselect, 13) = Me.txtsp.Value Cells(rowselect, 14) = Me.txtSR.Value End Sub
Your code will look like below:
(Picture 6)
After pasting the above code then run the code and change the value of any field and click on the update button. You will see that changes made in value by you in the Userform for that SL No header are reflected in the Sheet’s respective Cell.
We can modify the code a little bit also. After one record is modified if we want to modify another record then….Do we need to start from scratch once again?
No… what we can do is we simply give a message box which will prompt that records have been modified. Do you wish to continue?
Recommended:
Update and Delete Using Excel VBA Userform, Remove Password From Excel Using Excel VBA (Coding) or you can learn many more related tips & tricks. Learn More
Create Dynamic Graphs & Excel Presentation. Also, Learn How to create a Data Analytic Chart & Graph. Learn More
rowselect = rowselect - 1 msg = "Sl No " & rowselect & " Successfully Updated...Continue?" Unload Me ans = MsgBox(msg, vbYesNo, "Update") If ans = vbYes Then UserForm1.Show Else Sheets("Data").Select
Now if you run the code and choose any SL No then you will get all the values for the other boxes. If you change any value of any box and click on the “Update” button, you will see the same value is now updated in the sheet and it will give you a message that SL No has been updated and do you want to update other SL No or not.
(Picture 7) – VBA user form
If you click on Yes then the same form will be reloaded and by clicking on No you will be redirected to the sheet where you have updated the data.
Learn how to use Flash fill in Excel and related tips & tricks in Excel VBA Course: Click here for more details
We will apply the theory in case of delete and then apply the below code
Sheets("Data").Select Dim msg As String Dim ans As String If Me.cmbslno.Value = "" Then MsgBox "Sl No can not be Blank!!", vbExclamation, "SL No" Exit Sub End If Dim rowselect As Double rowselect = Me.cmbslno.Value rowselect = rowselect + 1 Rows(rowselect).EntireRow.Delete rowselect = rowselect - 1 msg = "Sl No " & rowselect & " Successfilly Deleted...Continue?" Unload Me ans = MsgBox(msg, vbYesNo, "Delete") If ans = vbYes Then UserForm1.Show Else Sheets("Data").Select End If
Now if you want you may hide the sheet from the user. So that user will update or delete the data using the userform only. But here is one problem. Every time you need to choose the value from the SL no drop-down button.
Why not such type of userform where I need to choose only 1 time and then I can add, update, delete, previous, next to all the button in a single user. We will create the same in the next blog
Excel VBA Macros for Non-Coders
Do you find VBA Macros scary? Did you miss any job opportunity because of it? Get started today with our eBook guide on using – Excel VBA Macros. 140 pages of rich visuals. Download now.